
“`html
If you’re a fan of comforting, home-cooked meals with a unique twist, these High Protein Mini Pumpkin Chicken Pot Pies are exactly what you’ve been searching for. Packed with flavor, easy to make, and meal-prep friendly, this recipe is a healthier, protein-rich take on a classic comfort food dish! For more ideas on incorporating protein into baking, check out our guide to high-protein baking techniques.
Why You’ll Love This Recipe
- Flavor: Savory chicken filling paired with a buttery, flaky crust and balanced with rich nutrients.
- Protein Boost: Includes unflavored protein powder for a health-conscious alternative.
- Family-Friendly: Perfect for kids and adults—it’s always a crowd-pleaser.
- Convenient: Meal-prep friendly, making 12 individual pies, ideal for busy weekdays.
Ingredients Needed
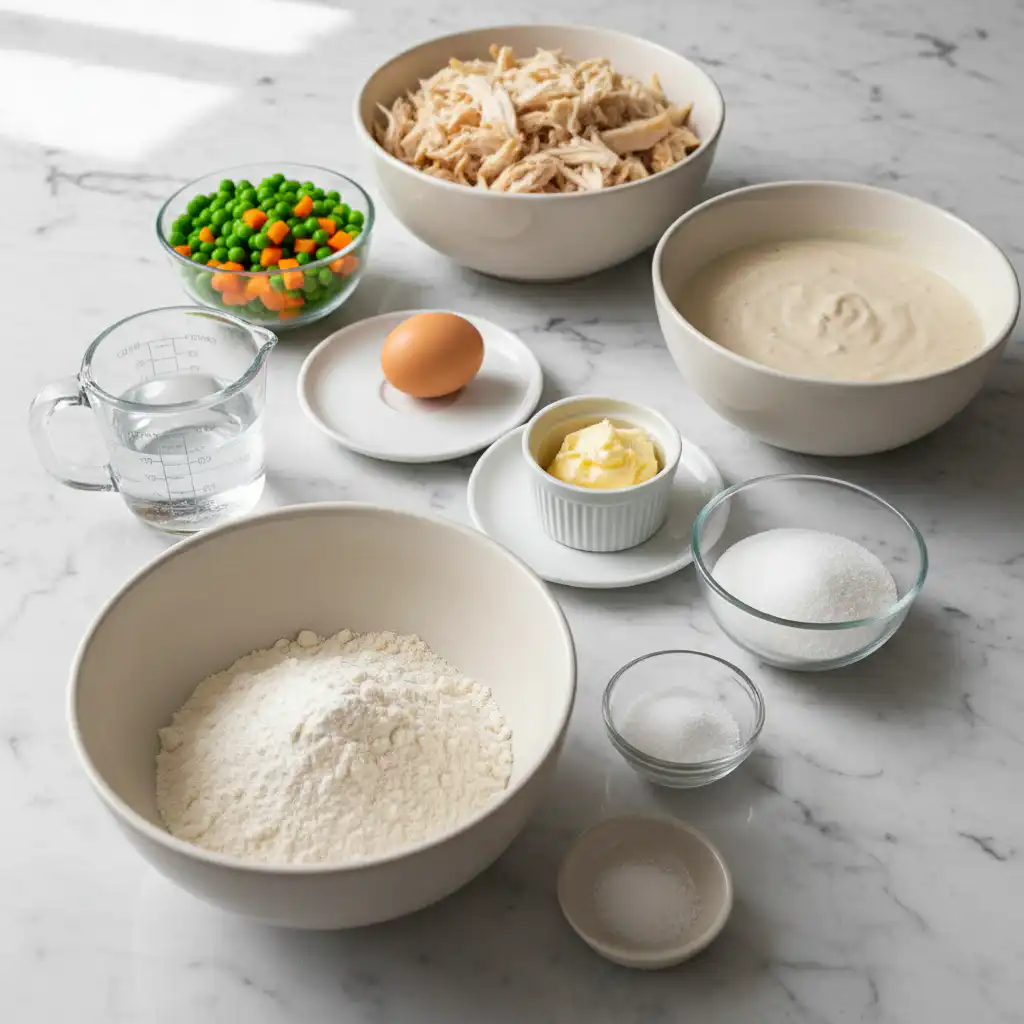
- 180g All-Purpose Flour
- 75g (2.5 Scoops) Unflavored Protein Powder (can swap this out for same amount of flour if needed)
- 50g Granular Sugar Substitute (or regular sugar)
- Pinch of Salt
- 126g Light Butter/Butter Spread (I use Country Crock original)
- 1/3 Cup Cold Water
- 1 Egg for Egg Wash
- 1 Cup (about 125g) Cooked & Shredded Chicken (I just used leftover rotisserie chicken)
- 1/2 Cup (128g) Canned Peas & Carrots (can also use frozen)
- 3/4 Cup Fat-Free Cream of Chicken Soup
Ingredient Notes & Substitutions
Unflavored Protein Powder: Easily swap for the same amount of all-purpose flour if you prefer a more traditional crust.
Light Butter Options: While I use Country Crock original, you can substitute with salted or unsalted butter as well.
Sugar Substitute Options: Granular sugar substitutes work great, but you can also use regular sugar or a coconut-based substitute for healthier alternatives. For more on healthy sweetener options, refer to our article on healthy sugar substitutes.
Chicken Variations: Rotisserie chicken makes things easy, but any cooked and shredded variety works fine.
Vegetable Flexibility: You can use frozen or fresh peas and carrots in place of canned.
How to Make High Protein Mini Pumpkin Chicken Pot Pies
Step 1: Prepare the Dough
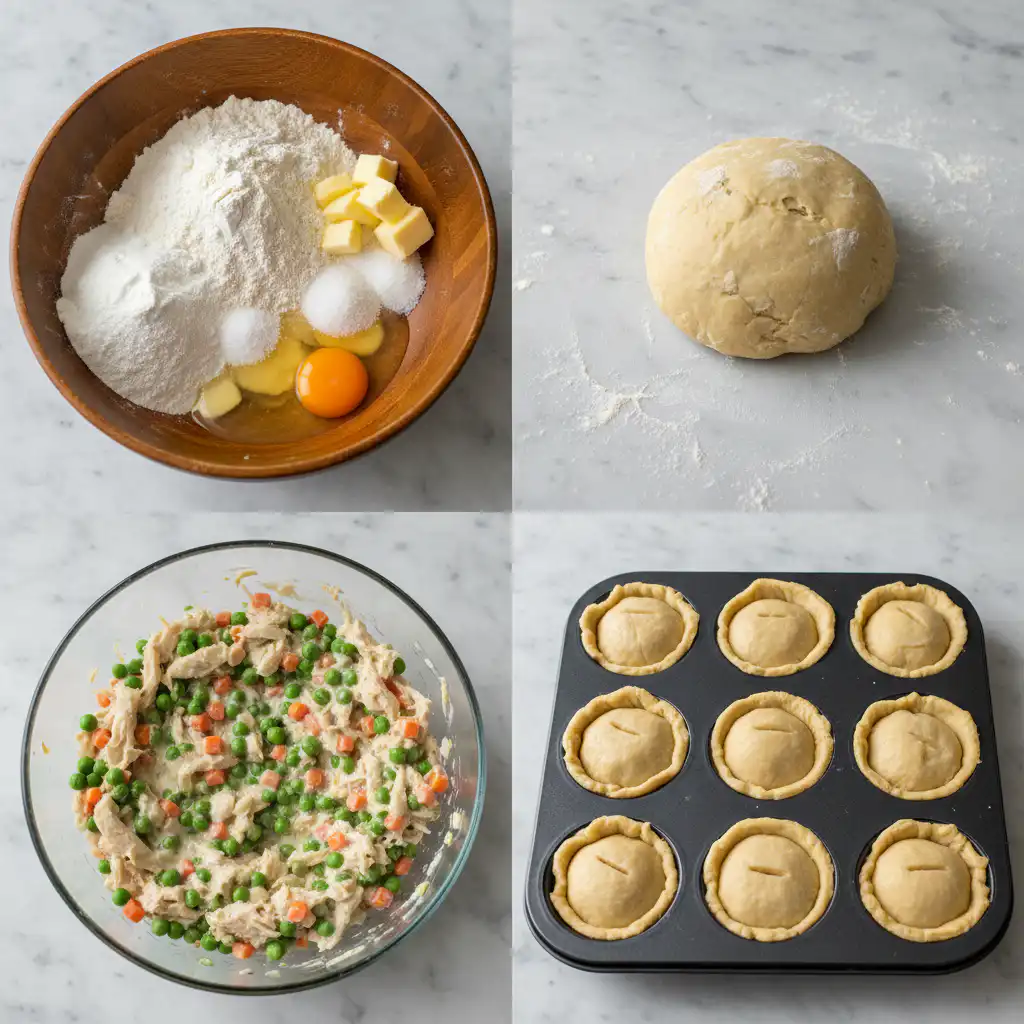
In a large bowl, combine the all-purpose flour, protein powder, sugar substitute, and a pinch of salt. Next, cut the butter into the dry mixture by adding small amounts at a time. Gradually pour in 1/3 cup of cold water and stir until the ingredients come together to form a dough ball.
Step 2: Shape the Dough
Lightly flour a surface, like parchment paper, and divide the dough into 12 equal pieces. Break off a small portion from each piece to create the mini pie tops. Flatten out these smaller pieces and set them aside.
Press each larger dough ball into a muffin tin compartment, making sure it covers the base and sides. The dough will be slightly thin, which is normal for pie crusts.
Step 3: Make the Filling
While your oven preheats to 400°F, mix the cooked and shredded chicken, canned peas and carrots, and cream of chicken soup in a large bowl. Stir until thoroughly combined. These ingredients are versatile—you might also enjoy experimenting with similar cozy recipes like easy comfort food meals.
Step 4: Assemble the Pies
Spoon the chicken mixture into each prepared pie crust until evenly distributed. Use the smaller pieces of dough to cover the filling, flattening them into discs and pressing around the edges to lightly seal.
Step 5: Add the Finishing Touch
Poke small holes into each pie top using a fork. Beat the egg in a small bowl and brush it over the tops for a golden, glossy finish. Alternatively, use melted butter for this step.
Step 6: Bake
Bake at 400°F for 12 minutes. Once the pies are golden and bubbly, remove them from the oven. Let cool for a few minutes before serving or storing for later.
Storage and Reheating Tips
Storage Instructions
- Refrigerator: Store cooled mini pot pies in an airtight container for up to 4–5 days.
- Freezer-Friendly: Wrap each pie individually in cling wrap, then place them in a freezer-safe bag. Store for 2–3 months.
Reheating Instructions
- Oven: Reheat pies at 350°F for 8–10 minutes to maintain the flaky crust.
- Microwave: Warm for 1–2 minutes, covering with a damp paper towel to retain moisture.
Pro Tips & Troubleshooting
Pro Tips
- Work with cold butter for the flakiest crust.
- Don’t skip the egg wash; it gives the pies a beautiful golden finish.
- Use leftover rotisserie chicken for convenience and added flavor.
Common Mistakes to Avoid
- Avoid overmixing the dough, which can make the crust tough.
- Don’t use warm butter, as it can make the crust less flaky.
- Refrain from skipping the egg wash if you want a lovely golden crust.
Serving & Storage
Serving Ideas
- Serve warm, straight from the oven, alongside a fresh salad or a bowl of comforting soup.
- Perfect for lunchboxes or as an appetizer for family gatherings.
Storage and Make-Ahead
These mini pot pies are meal-prep friendly! Follow the storage instructions above to easily prepare meals ahead of time and enjoy them throughout the week.
FAQ
Can I freeze these pies?
Yes! Simply wrap each pie individually in cling film and store them in a freezer-safe bag for up to 2–3 months. Reheat directly in the oven for best results.
How do I store leftovers?
Leftovers can be stored in the refrigerator in an airtight container for up to 4–5 days. When ready to enjoy, reheat in the oven or microwave.
What substitutions can I make?
Swap unflavored protein powder with all-purpose flour for a more classic texture. Granular sugar substitutes can also be replaced with regular sugar or coconut sugar.
How long does this recipe take to make?
From start to finish, this recipe takes approximately 20 minutes of prep time and 12 minutes of baking time.
Conclusion
These High Protein Mini Pumpkin Chicken Pot Pies are the perfect combination of comfort food and nutrition. Easy to prepare, delicious, and versatile, they’re designed with meal-preppers and family dinners in mind. Give this recipe a try, and enjoy the taste of perfection in every bite!
“`
High Protein Mini Pumpkin Chicken Pot Pies
Ingredients
Equipment
Method
- In a large bowl, combine the all-purpose flour, protein powder, sugar substitute, and a pinch of salt. Cut the butter into the dry mixture by adding small amounts at a time. Gradually pour in 1/3 cup of cold water and stir until the ingredients form a dough ball.
- Lightly flour a surface and divide the dough into 12 equal pieces. Break off a small portion from each piece to create the pie tops. Flatten out these smaller pieces and set aside. Press each larger dough ball into a muffin tin compartment, covering the base and sides.
- Preheat the oven to 400°F. Mix the cooked and shredded chicken, canned peas and carrots, and cream of chicken soup in a large bowl until combined.
- Spoon the chicken mixture into each pie crust. Use the smaller dough pieces to cover the filling, flattening them into discs and pressing the edges to lightly seal.
- Poke small holes into each pie top using a fork. Beat the egg and brush over the tops for a golden finish.
- Bake at 400°F for 12 minutes until golden and bubbly. Let cool before serving or storing.
No comment yet, add your voice below!